


Monitor calibration is the first step towards developing a color managed workflow. In a color managed workflow, we strive to achieve consistency in brightness, color, contrast and tone from capture to print. Paper only reflects light, unlike a monitor which can emit light. Hence the brightness, color saturation and tonal qualities of paper is completely different to that of a monitor. To achieve a neutral ground, we calibrate the mediums on which we view our images.
To understand what it takes to calibrate a monitor, we first need to understand what an .ICC profile is. An ICC profile is a file which is used by the computer’s operating system to display colors as accurately as possible on a screen or in print. We have unique .ICC profile for both monitors and for archival paper.
Wait, what is archival paper? This stuff is getting too confusing, you must be thinking. So take a step back and read this first.
Unfortunately, photographers think that calibrating their monitors will give them accurate colors in print. This is not true. You certainly need to calibrate your monitor to make sure that your display is not too bright or the colors are not too saturated. This is the most essential step in post processing, especially if you use Lightroom or Photoshop to edit your RAW files. But there are other steps you need to follow in a color managed workflow to be assured of good quality prints.
Read on to understand how to do it correctly and the reality of what you can achieve by calibration.
Before You Calibrate Your Monitor
To calibrate your monitor, you will need:
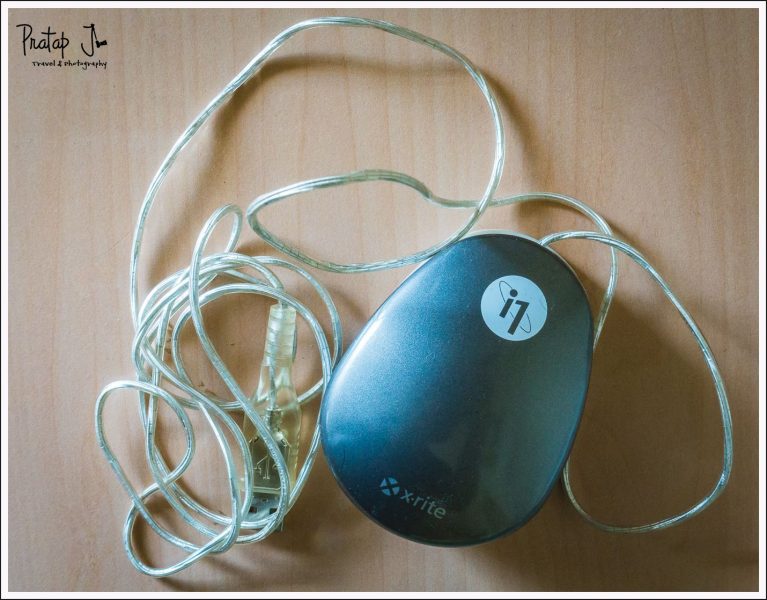
- A device, commonly known as a spyder, which is used for calibration. The technical term for this this device is photo colorimeter.
- A monitor which has a large color gamut. Now a days, even medium range not-so-expensive monitors have good color reproduction. An external display is almost always better than a laptop display when it comes to color reproduction. Calibration is not going to help you much if you are using a cheap monitor or a laptop which does not have a good display.
- Consistent and even lighting. Your digital darkroom, unlike implied by the name, should not be dark. But it should not be too bright either. The lighting around your monitor should not be over-powering. You should work in a mildly lit environment. If possible, pay attention to the color temperature of the light. The color of the light should not be too warm (orange) or too cool (blue). The ambient light around the monitor should ideally be 4700K.
- To turn off auto brightness on laptops. Generally laptops have an auto-brightness feature which interferes with the calibration process. This also means that you should ideally use your laptop in the same lighting condition as where you have calibrated it. Since that defeats the purpose of owning a laptop because it imposes a restriction on mobility, it is better to use an external monitor for post processing.
 Monitor Calibration Methods

Essentially, there are two methods to calibrate your monitor:
- Calibration by eye. This method involves adjusting the brightness and contrast settings on your monitor by using visual aids. Alternatively, you could use a software utility such as QuickGamma (which also relies on your visual inputs). These methods are not very effective.
- Calibration using a photo colorimeter (or spyder). This method uses an external device which connects to your computer or laptop via USB. The photo colorimeter is placed on your monitor during calibration. Sensors in the photo colorimeter read the color, brightness and contrast output from your display via a software. The software uses this information to create an .ICC profile suited for your display. Your operating system then makes use of this .ICC profile to render color, contrast and tone as accurately as possibly.
Since using a photo colorimeter is more accurate than the visual methods, it is the method used by professionals. Let us look at the steps involved in using a photo colorimeter.
 Using a Photo Colorimeter (Spyder) to Calibrate Your Monitor

Some of the popular photo colorimeters in the market today are manufactured by companies such as X-Rite (X-Rite i1Display Pro), DataColor (Datacolor Spyder5PRO) and SpectraCal (SpectraCal C6 Colorimeter).
No matter which current generation spyder device you use, the basic procedure is more or less the same. Advanced models may offer more features that are explained in their manuals.
Here are the basic steps to perform monitor calibration:
- Install the calibration software that came along with the photo calorimeter device. After you install the software, check for updates. Mac OS is notorious for software incompatibility, so ensure that you use the right version of the software for your OS version.
- Let your display warm up for 30 minutes after you turn it on. During this time, feel free to use it as you would normally do.
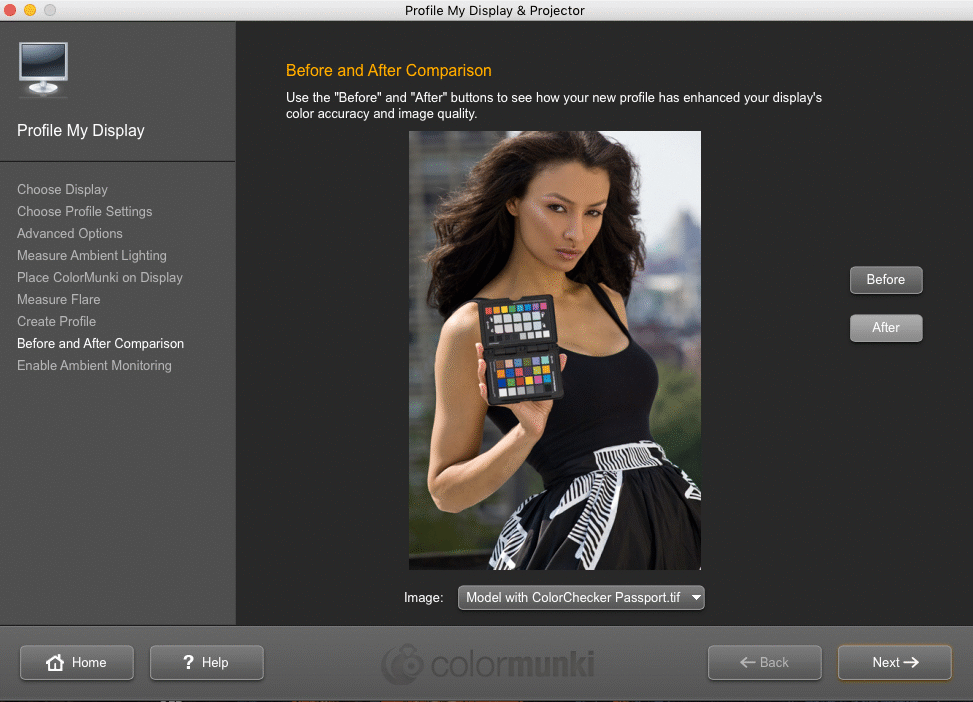
- Start the calibration software which you installed, place the photo colorimeter (spyder) on your display and follow the on-screen instructions. If you are given a choice to input values, select the following:
- Luminance: 120
- Gamma: 2.2 for PC and 1.8 for Macs
- Color temperature, 6500K for D65
- Color display: 24-bit
- Measure ambient light: No (because unless you work inside a studio, the ambient light would keep changing).
- After the calibration software has taken inputs from you, or has asked you to make your selection, it will start doing its job. Typically you’ll see various colors displayed on your screen. The software might also instruct you to adjust the brightness and contrast of your monitor. The photo colorimeter measures the color and brightness output. The software will communicate with your display and automatically adjust various parameters. The entire calibration process might take a while.
- Once the calibration routine is over, the calibration software will create an .ICC profile. You should save the profile at the default location where your computer’s operating system stores .ICC profiles. Once you do this, your monitor should start using this .ICC profile automatically.
That is it. You have successfully calibrated your monitor! The best way to check if your monitor is using the .ICC profile that you have created is by switching profiles in the OS and visually observing if the colors that are displayed on the screen change. Sometimes the change is subtle, sometimes it is very obvious.
Common Calibration Myths
Now that we have seen the steps involved in calibrating a monitor, let us look at some common myths:
- Myth: You must use the .ICC profile created by your calibration software as the working color space in Photoshop.
Reality: You must only check that Photoshop is aware of the .ICC profile that you created. This will happen automatically if you have placed the .ICC profile in the correct folder on your operating system. The working color space in Photoshop should still be sRGB, ECI-RGB V2 or Prophoto RGB.
The monitor .ICC profile that you created as part of the calibration process records the “defects” of the display device. By reading the ICC profile of a monitor, Photoshop knows how to fix the colors so they are correctly displayed.
- Myth: Calibrating your monitor will give you accurate colors in print.
Reality: You must softproof your photos before printing to get accurate colors. Monitor calibration is only the first step of softproofing. You must also ideally use a monitor which benefits from calibration. Not all monitors are created equal.
- Myth: You can share .ICC profiles with others who have the same brand of monitor.
Reality: An .ICC profile are specific to a monitor and hence there is no benefit from sharing it. The ability of a monitor to display colors deteriorates as it ages, so each monitor is unique.
- Myth: You can use the sRGB .ICC profile for your monitor
Reality: sRGB is a generic profile which is attached to images. It cannot be used for your monitor.
- Myth: You can achieve 100% color accuracy in your prints after calibration.
Reality: Even after you calibrate your monitor and soft proof your images before printing, you may not achieve 100% color accuracy. A good printer can achieve close to 90% accuracy. This is because of shortcomings in the devices. Your monitor should have a very large color gamut to reproduce colors accurately. Your printer should be of very high quality too. Inkjet printers produce colors by mixing cyan, magenta, yellow and black ink. Expensive printers have more shades of black to achieve a higher degree of accuracy. Unfortunately, commercial printing labs tend to use a different technology called Laser Chromogenic (Digital RA-4) or Dye Sub which is prone to color inaccuracies. These devices are cost effective but not of very high quality. Some printers use non-OEM ink in the printer which also reduces the accuracy of colors.
Archival printing with a color managed workflow is a dark science. If you print outside in a lab, both your monitor and the printer’s monitor should be calibrated. That way, both of you are on the journey of the color managed workflow together. Unfortunately in India, most labs tweaks colors manually on a monitor that is matched exclusively to their printer. This method is error prone and person-dependent. For this reason, I do my own archival printing at home.
 In Bangalore, I recommend the following printers:
- Prnt Gallery. Address: 69, 9th Main Rd, 2nd Block, Jayanagar, Bengaluru, Karnataka 560011
- Photostop – Canvas Prints , Giclee Prints
I am available for consultation on archival printing and practical inputs on maintaining a color managed workflow. I have been doing my own archival printing since 2007.
1 Comment
Hi, I’m looking for a monitor color calibrator in Bangalore. If you know any store please let me know.